Quantcast
Channel: JavaScript – Sugar Developer Blog – SugarCRM
Viewing all 27 articles
Browse latest View live

Global Action Menus and Drawers in Sugar 7

$
0
0

Editor’s Note: This blog post comes from Bill Convis of SierraCRM, and talks about how his team worked with our top notch engineering team to find a way to add action menu items across multiple modules. Big thanks to Bill for the writeup, and Peter DeMartini of SierraCRM, and David Wheeler of SugarCRM for helping form the solution.

With the release of SugarCRM 7 came new challenges and opportunities for SugarCRM technology partners. An entirely new paradigm was offered for solution providers to add new features to the power of SugarCRM. Process Manager Enterprise (PM) from SierraCRM, a workflow solution that augments SugarCRM’s existing workflow, was being updated to take advantage of the new architecture.

One of the features to be added to the new release of PM was the ability to see all the processes for a single object. Our intent was to show both processes that had been completed and process that were currently active.

After reviewing the options, a decision was made to add an “action item” to a record view to display a drawer with a listing view of the processes for that record.

We approached John Mertic at SugarCRM and asked him if there was an extensible framework for action buttons, as we wanted to build a solution that was both upgrade safe and would be global across all modules. He suggested we meet with the engineers at SugarCon.

At the SugarCon 2014 conference in San Francisco, Sierra’s senior developer, Peter DeMartini, met up with SugarCRM Engineer David Wheeler at one of the hacker sessions.

David suggested an approach in which we would keep the ./custom/clients/base/views/record/record.php which would define the button for every record. Then a new file that would enable us to include the javascript code behind the button click event in every module in SugarCRM that displays the record view.

This new file would be ./custom/clients/base/layouts/record/record.php.

In record.php we injected our custom layout, pm-record-logic, into the baseline record view. This pm-record-logic layout was the key to ensure that custom javascript code was guaranteed to be present for the modules record view and this javascript would be available on the click event of the new action button.

The final file that was created with the help from David (this was the most important piece for us) was the pm-record-logic.js file. David suggested we extend the initialize function , call the _super method and then bind our code to the click event for the button created above. The code snippet is:

We will now present the code in its entirety with instructions for other solution providers to accomplish the same thing:

The first file is record.php and lives in ./custom/clients/base/views/record/record.php

This file adds the action button to the action menu. The ‘name’ => ‘pm_record_reports’ will map to a file ./custom/clients/base/views/pm-record-logic/pm-record-logic.js with an initialize function that will set this buttons name to a click event function.

The next file is also named record.php and lives in ./custom/clients/base/layouts/record/record.php

What is key in this file is the ‘layout’ => ‘pm-record-logic’. Which allows us to inject our custom view into every record view.

Our first file is:

./custom/clients/base/layouts/pm-record-logic/pm-record-logic.php

And our handle bars file ./custom/clients/base/views/pm-record-logic/pm-record-logic.hbs

And finally our pm-record-logic.js file which makes the api call to Process Manager to retrieve all the processes for the given object:

./custom/clients/base/views/pm-record-logic/pm-record-logic.js

The remaining files used in this customization are the view and layouts for the actual data returned by Process Manager to be shown in the drawer.

What was key to this customization, and what we learned from the outstanding support from John and David, was the ability to be able to guarantee that our new action button click event function in javascript would be placed on the action menu for most modules (excluding Leads) and that we had confidence that the javascript functions on the click event would also be present.


A common Sugar 7.x Dashlet Gotcha

$
0
0

Sugar 7 Dashlets

As you may know Dashboards and Dashlets are some of Sugar 7’s most popular front-end features. Customizable Dashboards empower users with the ability to customize the contextual intelligence that gets delivered to them by their CRM within every single view of the application.  For Sugar Developers, Dashlets allow us to deliver contextual intelligence (including integrations) to our end users in a well encapsulated component and a consistent pattern.

A Dashlet Gotcha!

Since Sugar 7 Dashlets are just Sidecar views, there is metadata that you need to manage.  So one of the biggest things you’ll want to remember when working with Dashlet metadata is that Dashlet metadata gets copied into the dashboards table. If you change the .php metadata file for the dashlet, you need to make sure that you delete the old dashlet definition from the database for the module/view you are testing it on.  Otherwise no matter how many times you clear your cache, restart your computer, or throw your mouse, that dashlet won’t be doing what you’re expecting it to do!

The simple way

The simplest way to do that is to delete the dashlet using the Sugar user interface.

Removing a Dashlet

Removing a Dashlet

Once you’ve done that, you can edit your dashboard to add your dashlet over again and this time it will include the updated metadata.

The automated way

If you are doing a lot of dashlet development and are interested in a way to automate this process a bit, then you can create a dashboard cleanup SQL script that goes into the dashboards table and deletes the row for your test dashboard.

See below as an example of working with a Dashboard entry in Sugar 7.5.0 via the Sugar database.

SQL query: SELECT name, dashboard_module, dashboard_type, metadata FROM `dashboards` WHERE name = ‘Test Dashboard’;

name dashboard_module dashboard_type metadata
Test Dashboard Accounts dashboard {
“components”: [
{
“rows”: [
[
{
“view”: {
“type”: “dashablelist”,
“label”: “Test Dashlet”,
“display_columns”: [
“name”,
“billing_address_country”,
“billing_address_city”
],
“module”: “Accounts”,
“skipFetch”: true,
“last_state”: {
“id”: “dashable-list”
},
“componentType”: “view”,
“intelligent”: “0”,
“limit”: 5,
“filter_id”: “assigned_to_me”
},
“context”: {
“module”: “Accounts”,
“link”: null
},
“width”: 12
}
]
],
“width”: 12
}
]
}

Once you’ve located your row, you can delete it easily.

SQL query:  DELETE FROM `dashboards` WHERE name = ‘Test Dashboard’;

1 row deleted.


Using Underscore.js to improve Sugar 7 performance

$
0
0

If you’ve browsed the Sugar 7 JavaScript codebase much then you’ll notice that we use Underscore.js all over the place. Use of _.each, _.bind, _.debounce, _.filter, and more are littered throughout the Sugar 7 codebase.  It’s not uncommon to see multiple usages of it on the same line of code.

 this.resize = _.bind(_.debounce(this.resize, 200), this);

In order to get a quick estimate of how often Underscore is used, you can do a quick search for “_.” within JavaScript sources.  The Sugar 7.5 JavaScript codebase turns up 5,976 uses of Underscore.js!

We love Underscore for a couple different reasons.  First off, it helps make our JavaScript code much more readable than if we used vanilla JavaScript everywhere.  Secondly, there’s some handy utilities in Underscore that can be expertly applied to improve Sugar 7 application performance.

Read below to learn how several Underscore.js Function utilities can be used to improve performance and responsiveness of your apps.

Lets start with a real example where we used _.debounce() to improve performance for end users of Sugar 7.5.

What debounce does is postpone execution of a function until after an elapsed time has passed since a function was last called.  In this case, the throttledSearch function gets called every time there is a key press in a Sugar 7 Quick Search input box.  Without debounce, if a user was trying to type a search term like “Acme” then we’d be triggering search for “A”, “Ac”, “Acm”, and then “Acme”.  This creates a load on the server and gives impression that the search feature isn’t working properly because of the delay in displaying the final search results due to all the previous unnecessary requests.

Using _.debounce(fn, 400) means that searches will not be triggered until the user pauses typing for almost half a second (400 milliseconds).

_.throttle() is similar except that it triggers the wrapped function at most once for every given time interval.  This makes it useful to implement some sort of rate limiting if you expect many requests to occur faster than they could be reasonably handled.

_.defer() is my favorite Underscore function.  It allows you to put an operation that doesn’t need to be run immediately on the JavaScript event queue where it will be executed later after any pending UI events.  This improves user experience of the app since it shortens long running JavaScript operations that would otherwise block the user interface and make the web app appear unresponsive.  If you want to pop up an informational dialog or re-render a view – do you really need to do it synchronously?  Probably not.  A momentary delay in favor of a responsive user interface is a very good trade-off.

There’s a lot more to Underscore than what I’ve described here.  I hope you take the time to explore it and incorporate usage of it into your Sugar 7 apps and customizations!


How Type and Name attributes affect Sugar 7 Views

$
0
0

Sugar 7 allows you to define your own view metadata for creating new custom layouts and views.  In these custom view definitions, the correct use of the type and name attributes is essential when you want to reuse metadata, controllers, or templates from other Sidecar components. But what are type and name?  How are they used? In this post, we hope to provide you a better understanding of these attributes and how they are used by Sidecar when your components get created.  Most importantly, this post will serve as a guide for the correct use of type and name in your Sugar 7 view metadata that will maximize your ability to reuse.

Read more below!

Review of Basic Components

There are three basic Sidecar components in Sugar 7 user interfaces: layout, view, and field. A layout contains views and other layouts. It is primarily used to lay out various components of a page. For a simple application, a layout should be lightweight. It should create and define other components and nothing else. A view is where most of the work happens. It is also where fields are created and are defined.

Components consist of three parts: definition, controller, and templates. Component definition specifies the components to be created and its customizable attributes. Controller adds behavior and logic to components via JavaScript. Templates provide HTML to the component through Handlebars template engine.

For more information, you can read about layouts, views, and fields in the Sugar 7.5 Developer Guide.

Component Definition

There are two ways to create and define your components. The first is to reference an existing component definition. The second is to specify it directly in your component.

Layout example

In the above example, the layout definition tells the application that this is a “foo” layout and the name is “bar.” It directly defines “header” and “base” layouts. For the “header” layout, the application gets the definition from “header” layout to create its components. The “base” layout, which is defined directly, has two views “title” and “content.” These two views are referenced like the “header” layout. So, the application will retrieve these definitions from the two views to create them.

View example

In the above example, the view definition indicates that this is a “foo” view, and it has two buttons: cancel and save.  The two buttons, which are defined directly, are fields with type “button” with one named “cancel” and the other “save.”

Component Controllers

Both the type and name attributes are used to determine which JavaScript controller is used for a particular component.

For all component types, when the type attribute is set then it is used to select the JavaScript controller to initialize.  For views and layouts, if type attribute does not exist then the name attribute is then used. For fields, only the type attribute is examined.

Layout example

In the above example, since “foo” layout has type attribute specified, the application will use the “foo” layout JavaScript controller.

View example

In the above example, “foo” view does not have type attribute. So, it will look at the name attribute to get the JavaScript controller. For the button inside “foo” view, JavaScript controller for button field is used.

Component Templates

The type and name attributes also affect which HTML templates are used.

For both layouts and views, the application uses the name attribute to select the HTML template. If that template does not exist, it uses the type attribute. For views only, the template attribute can be used to specify which template to use. For fields, the template is determined by the type attribute but also a variety of other factors such as user ACL, current action, and the name of the parent view.

Layout example

In the above example, “foo” layout will use “bar” template in “foo” layout. If the template does not exist, it will use “foo” template.

View example

In the above example, “foo” view will use “detail” template in “foo” view. If that template does not exist, “bar” template will be used. If “bar” template does not exist, it will use “foo” template.

Best Practices

  • For clarity, specify both type and name attributes when specifying your view definitions.
  • When referencing another views and layouts in your definition, use the name attribute only.
  • For views and layouts, type and name attributes should have the same value in most cases. In cases where type and name attributes need to differ, please note that the component will use the name attribute to determine its metadata, the type attribute to determine its controller and the name attribute to determine its template.

Sugar 7.5 Metadata Diving for Smarter Integrations

$
0
0

Many Sugar Developers are looking to build intelligent API integrations with Sugar that goes beyond Create-Read-Update-Delete (CRUD) operations.  The key to building robust and intelligent API integrations with Sugar is held within the Sugar Metadata.

Sometime it is interesting to understand what dependent dropdowns exist on any given Sugar module.  A common use case would be to display appropriate UI with properly populated drop down lists to end users of an integration with Sugar 7.

Example Dependent Dropdown

Example Dependent Dropdown

If you don’t have the dependent dropdown formula then you are stuck guessing at what options are available or showing the user the full list of options when only a subset of them are valid choices.  The key for addressing these user experience concerns and for anybody else wanting to take their Sugar API integration to the next level is the Sugar Metadata API.

If you are familiar with Sugar 7 then you probably know that we use the v10 REST API to drive the Sidecar framework used in our web, mobile, and portal clients.  Sugar Logic formulas are configured in Sugar Metadata which means the Metadata API is how the Sidecar framework is made aware of them.

Example dependent dropdown within Sidecar

Example dependent dropdown within Sidecar

If you are building a Sidecar client then Sugar Logic gets handled for you automatically – but otherwise you can mine the metadata to find the tools you need.

For convenience, you can browse the entire Sugar metadata cache for any user using your browser’s dev tools (such as Chrome Dev Tools used in example below).  Just log into Sugar 7 as your target user, open your javascript console, and run the commands below.  This will return the current metadata payload that was retrieved from server via Metadata API.

SUGAR.App.metadata._dev_data;

In this example, the full options list of display values used is available within app_list_strings.car_list.

SUGAR.App.metadata._dev_data.app_list_strings.car_list;

This can be compared with the dependent dropdown formula found in the Opportunity Record view metadata.  Sugar Logic defines dependencies between fields that affects their presentation to end users.  So you’ll find this information mixed into the View metadata in the dependencies hash.

SUGAR.App.metadata._dev_data.modules.Opportunities.views.record.meta.dependencies;
Example dependency console log output

Example dependency console log output

This should give them all the information they need to intelligently work with this dependent dropdown field.  Now they can decide how they want to handle these in their integration.

A quick note about programming against Metadata API

The Sugar metadata payload is pretty large so you’ll want to cache it as much as possible.  It’s a good idea to only retrieve the metadata for modules you care about to limit the size of the request.  You should track the metadata hash value which can be used to reload metadata only when it changes.  Again, if your code is running within Sugar 7 (and therefore using the Sidecar framework) then metadata is refreshed automatically as needed – so you can always assume the metadata you find there is up to date.


Adding Views to Sugar 7.5 footer

$
0
0

There are certain parts of the Sugar 7 user interface that are always available to the user.  For example, the Sugar Cube at the top left corner of both our mobile and web applications is always visible as an anchor that allows the user to return to their home dashboard.  Another example is the Help button that is displayed in the Sugar 7 footer.  It is available in every screen and allows the user to toggle the display of the contextual help dashboard for whatever they happen to be doing.

Help button in the Sugar 7 application footer

Help button in the Sugar 7 application footer

Most examples of UI customizations in Sugar 7 involve making additions to particular modules, dashboards, or screens within the application.  However certain features benefit from being available at all times because they can be applied universally.  A good example would be a collaboration feature such as in-application chat or a share button.

In this post, we will show how easy it is to add your own custom Views to the Sugar 7 application footer layout that can serve as anchors for a custom feature or integration with Sugar.

We will add a Chat button that will display an alert when it is clicked on whatever screen is currently in use.  You will see it is as easy as adding a new Sugar 7 view to an existing layout.

All we will need is three files.  Two to define our custom View HTML and View controller.  Then one more to define the extension to the Sugar 7 footer layout.

Step 1: Create a new custom View for your Footer contribution

Add my-app-action.js and my-app-action.hbs from below to custom/clients/base/views/my-app-action/

Step 2: Add your custom View as an extension to the Footer layout

Add addFooterAction.ext.php from below to custom/Extension/application/Ext/clients/base/layouts/footer/addFooterAction.ext.php

Then run Quick Repair and Rebuild and try it out.

Chat button in Sugar 7 footer

Chat button in Sugar 7 footer

In this code example, every time you click the Chat button you will see a Sugar 7 application Notice alert dialog that displays “Send a chat message!”  But of course you can easily replace this Sugar 7 alert with whatever you like!


Overriding an Action’s access control in Sugar 7.5

$
0
0

When it comes to customization, Sugar 7 is far away the best and most flexible CRM on the market. The Sugar framework empowers the developers to make heavy modifications in the user interface (UI) without touching the core of the product.

Our customers are always coming up with interesting use cases.  One customer asked me this question.

I don’t want my end users to accidentally unlink related Contact records.  Is it possible to selectively disable the Unlink button so that only some users are allowed to use it?

The Unlink action that our customer wanted disabled.

The Unlink action that our customer wanted disabled.

There are many ways to do this but here is an easy one that allow us to manage who has access to unlink a record using Teams.  But we could just as easily adapt this technique to use a Role or some other attribute of a Sugar user to do the same thing.  Sugar’s flexibility means your imagination is the limit.

Step 1: Create the “unlink” team

First off, we will add a new team called “unlink” to the Sugar instance.  Only users who are members of this team will be able to perform an unlink action.

Log in as a Sugar Administrator, navigate to the Administration > Team Management.  Then create the team “unlink” and add the Administrator user to this team.

Step 2: Override the UnlinkAction field controller

Since we want to make this change to all uses of the UnlinkAction in all subpanels, we will override the core UnlinkAction itself instead of defining a new one and configuring it via metadata.  This is convenient since it makes our change small but could be an issue during upgrade if the base Sugar implementation of UnlinkAction changes.  In Sugar 7, each Action’s access control is implemented by the hasAccess function.

Since we want most of the UnlinkAction’s behavior to remain the same we will start by copying clients/base/fields/unlink-action/unlink-action.js to custom/clients/base/fields/unlink-action/unlink-action.js

The changed code is annotated with “Olivier – Start” and “Olivier – Stop” comments below.

The change in the hasAccess function is straightforward.  We test the user’s list of teams to see if our special “unlink” team exists.

Step 3: Test it out!

Log in as the Administrator and run a Quick Repair and Rebuild if you haven’t already and clear your browser cache for good measure.

Now, have the Administrator visit an Account record with related Contacts.  Notice that the Administrator is allowed to unlink any contact from this view.

Log in as a regular user not on the “unlink” team. Visit the same Account record as before.  Notice that this user cannot unlink any of these related Contacts.

Log in as the Administrator again and add the previous regular user to the team “unlink”.

Finally, log in as the regular user again and visit the same Account record.  Notice that the user can now unlink related Contacts.


Creating a “Hello World” Dashlet for Sugar 7

$
0
0

For Sugar Developers, the Dashboard and Dashlet framework provided in Sugar 7 really helps you to build slick reusable Dashlets that can be targeted for certain parts of the app or made globally available anywhere in the app.  They’re also really easy to use which is something we are gonna highlight today.

For a more detailed look at how Sugar 7 Dashlets work then you should read up on the topic in the Sugar Developer Guide.  The focus on this post is to highlight the most basic elements necessary that we can then build upon in later posts.

A quick reminder

Just some quick advice to anyone about to embark on the Dashlet development journey.  We recently featured a post on a common Sugar 7.x dashlet gotcha.  Basically, dashlet metadata gets copied into database when you add a dashlet to a dashboard.  You’ll need to delete the dashlet or the dashboard and add it all over again whenever you modify dashlet metadata.  We are working on making this seamless in future but this is something you should remain aware of when building dashlets.

Creating a Dashlet Summarized

Dashlets are simply Sugar 7 Views that have some extra features added via the ‘Dashlet’ plug-in and an additional metadata requirement. This tutorial will be brief because creating a basic dashlet is incredibly easy.  As with any Sugar 7 view, we will need three files: a JS controller, a PHP metadata file, and a Handlebars template for the presentation.

Shall we begin?

Step 1: Create a ‘hello-world’ directory

In your Sugar 7 instance, create a new directory called custom/clients/base/views/hello-world and create three files called hello-word.js, hello-world.php, and hello-world.hbs inside.  This is just like any other Sidecar view in Sugar 7.

Sugar 7 Dashlets are just like any other Sidecar view

hello-world-folder-structure

Step 2: Implement the Dashlet Controller (JavaScript)

To make this “hello-world” view a dashlet, all we need to do is add one line to the view’s JS Controller.  This adds the ‘Dashlet’ Sugar 7 plug-in to your view.  This applies a bunch of changes in behavior to your view that gives it a Dashlet nature.  Plug-ins are essentially Sugar 7’s implementation of the Mixin JavaScript design pattern.  You can examine the Dashlet plug-in implementation under include/javascript/sugar7/plugins/Dashlet.js if you are curious but for the most part you don’t need to worry about the details.  Just know that all dashlets needs to include the ‘Dashlet’ plug-in in their controller.

At a minimum, Dashlet controllers must include the ‘Dashlet’ plug-in.

hello-world.js

Step 3: Implement the Dashlet Metadata (PHP)

Dashlet metadata is also fairly straightforward. Make sure your metadata is wrapped in an array labeled ‘dashlets’ and it should have the following params:

  • label – A String label, preferably a language string key “LBL_HELLO_WORLD_TITLE” or something similar that you’ve included in a custom language file
  • description – A String description, again, preferably a language string key
  • config – an array of config params (if applicable) that allows users to configure the dashlet before it’s added to a dashboard
  • preview – an array of preview params (if applicable) to be passed when your dashlet is “previewed” when being added to a dashboard
  • filter – an array of filter params (if applicable) for making this dashlet only show up on a specific view or module

At a minimum, all Dashlet metadata must include a ‘dashlets’ array that defines a ‘label’ and ‘description’.

hello-world.php

Step 4: Implement the Dashlet Template (Handlebars)

The template can be as basic as you want it to be.  There is no requirement for the content you put into the template.

There is no minimum requirement for Dashlet templates.  You are in full control of the presentation.

hello-world.hbs

Step 5: Run Quick Repair and Rebuild

So that is all the programming we need to do. With those three files in place, we just need to rebuild the cache so that Sugar 7 picks up our new Dashlet and makes it available to end users.

The simplest way to do this is to run Quick Repair and Rebuild or by manually removing the contents of your cache/ directory and reloading the Sugar 7 web app which will then rebuild the file cache automatically.

Step 6:  Add your Dashlet to a Dashboard

If you login now as any user and try to add a dashlet to any dashboard, you should see your “Hello World” dashlet listed.  This dashlet is an option within all dashboards because we did not specify and dashlet filter criteria in Step 3 when we defined the metadata.

Finding

Finding “Hello World” in the Dashlet Picker

After adding it to a dashboard and saving it, you should see your dashlet appear just like the one below.

“Hello World” on a Dashboard


Creating a Dashlet for Sugar 7 List Views

$
0
0

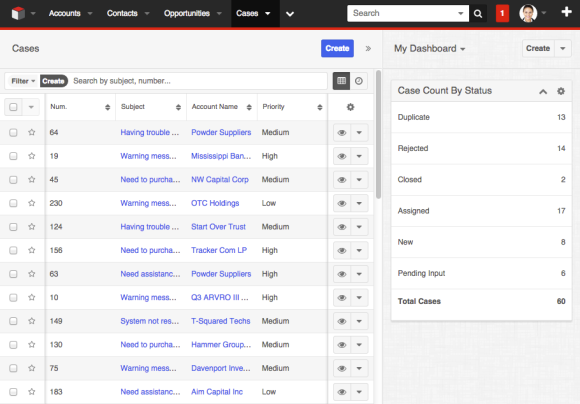
In our previous “Hello World” dashlet post, we established what a minimal dashlet entailed.  In these next post, we’ll be building on those skills to create a more useful dashlet that takes advantage of Sugar 7 List Views.  We will be creating a dashlet for Cases that binds to the list’s Collection and sums the number of Cases by their status.  So if the Cases list contains 5 records, and 3 of those are in “New” state and 2 are in “Closed” state then we want our dashlet to display “New: 3” and “Closed: 2”.  To the code!

File Structure

Again, using what we learned in the previous post, we’re going to create a folder in custom/clients/base/views/ called “case-count-by-status“. Inside that folder you should create 3 files:

  • case-count-by-status.php
  • case-count-by-status.js
  • case-count-by-status.hbs

You should have something that looks like the following screenshot: caseCountByStatusFileStructure

While technically optional, we will also utilize the Language extension in order to provide multilingual support for our example dashlet.  This extension file will be located at custom/Extension/application/Ext/Language/en_us.case-count-by-status.php.

Dashlet Metadata (.php file)

Dashlet metadata is going to look almost identical to our previous “Hello World” dashlet. We’re not doing anything too fancy here, so everything should look basically the same.

Dashlet Metadata Filter Options

Currently there are two main dashlet filter keys that you’ll see in the codebase; “module” and “view”.  Across of these filter keys, the main thing to remember is that not specifying a filter at all means that your dashlet will be available in all views of all modules. You only need to add filters if you desire to restrict your dashlet to a specific module or view.  Let’s look at the filter keys in more detail.

Specifying a filter means your dashlet will be restricted to specified modules and views.  Not specifying a filter means your dashlet will be available in all modules and views.

“module”

The module filter lets you add an array of modules where your dashlet can appear. If you wanted your dashlet to appear in the list of available dashlets for only the Accounts, Cases, and Contacts modules then your module filter would look like the following.

 'filter' => array(
     'module' => array(
         'Cases',
         'Accounts',
         'Contacts',
     ),
 )

“view”

The view filter lets you add an array of views to limit on which views your dashlet can appear. If you wanted your dashlet to appear only on the Record view, your view filter would look like the following.

 'filter' => array(
     'view' => array(
         'record',
     ),
 )

Currently, there are two possible values for the view filter. The List View is indicated by using “records”.  The Record View is indicated by using “record”.

Dashlet Controller (.js file)

Enough metadata nonsense, now for the fun stuff!  Here is the JavaScript controller for a Case Count By Status dashlet.

On a List View, this.context points to the BeanCollection.  this.context.parent points to a parent model (when it exists, such as on a dashlet preview).

Dashlet Template (.hbs file)

Again, with a Dashlet you are free to format the display any way you like.  However, we do recommend leveraging Sugar’s Styleguide so that your dashlet appears like a seamless extension of the Sugar user interface.  It is a great reference for you to leverage that allows your dashlets to appear as just another seamless part of the Sugar 7 application.

In this example, we leveraged some dashlet design patterns and CSS pulled directly from the Sugar 7 Styleguide.

Finding Styleguide in the Admin panel

Finding Styleguide in the Admin panel

The Sugar Styleguide describes how Sugar 7’s CSS works and the design patterns used in common components such as Dashlets.  The Styleguide is how you build seamless UI for Sugar 7.x.

As a Sugar Admin, navigate to Styleguide > Core Elements > Dashboards > Dashlets to view the Dashlets style guide.  Specifically, we borrowed CSS from the “Summary” dashlet example listed in the Styleguide.

Summary dashlet pattern documentation

Summary dashlet pattern documentation

Here is our Handlebars template we put together leveraging this “Summary” pattern.

Language Extension (.php file)

Finally, in the above Handlebars template and in the dashlet metadata file we have defined some display labels that need to be translated into human readable strings.  To accomplish this, we have added a language extension for these new labels that we have introduced.

It is a development best practice to use labels for strings so that your user interface can be translated and supported in multiple languages

The “en_us” at the beginning of this filename is significant.  It represents the user locale where these strings are used.  If you wanted to created translations for other locales, then this value would be different.  For example, French language extensions must start with “fr_FR”.

Wrapping Up

So now we’ve got a working example dashlet that takes advantage of a module’s List View.  Remember to run a Quick Repair and Rebuild and then navigate to your Cases module and add the new dashlet.  It should look something like what you see below.

Case Count by Status dashlet in action

Case Count by Status dashlet in action


Sugar 7 test tools now available!

$
0
0

Do you write unit tests for your Sugar customizations?

Do you performance test your Sugar on-site deployments?

Every developer knows they should be building unit tests and performance tests but sometimes it is just too hard to get started from nothing.  Well now SugarCRM Engineering is going to make it easy for you!

The Sugar 7 unit test suite and performance test frameworks that we use to develop Sugar 7 are now available to current customers and partners via Github!

This is the first release in a new effort to provide enhanced standardized development tooling and automation to the Sugar Developer community.

At this time, we are only releasing these tools to existing Sugar Customers and Sugar Partners.  So these private Github repositories require that you are logged in using your Github account in order to access them.  You may also need to request access from SugarCRM if you cannot access these repositories currently.

In the coming weeks, we will be posting step-by-step tutorials for creating Sugar 7 unit tests and custom JMeter scenarios. So stay tuned!

More details below.

Sugar 7.x Unit Test repository

Our JavaScript unit tests are built using Jasmine.  Our PHP unit tests were built using PHPUnit.

https://github.com/sugarcrm/unit-tests

Check out the README for getting tests installed and running in your development environment.  We also have a short NEW_TESTS guide that will help guide you in creating your own unit tests.

Sugar 7.x Performance Test repository

Additionally, we are making available the Apache JMeter based performance test framework for load testing your Sugar 7 on-site deployments.

https://github.com/sugarcrm/performance

Check out the README for getting your development environment setup and for running the existing JMeter scenarios.  You can adapt our stock JMeter scenarios to create your own test scenarios.

Requesting Access

Some partner developers will find that they already have access to the above repositories.  However, if you get a 404 screen when you click the links above then you do not yet have access.

If you are a current Sugar Customer or Sugar Partner, please request access here.

Again, you can only get access to these repositories at this time if you work for a current Sugar Customer or Sugar Partner.

Any questions/concerns/accolades can be e-mailed to developers@sugarcrm.com.


Creating JavaScript unit tests for Sugar 7

$
0
0

This tutorial will cover the creation of new Jasmine unit tests for testing your Sugar 7 front end code.

In order to follow this tutorial, you will need access to the Sugar 7 Unit Test repository.  Make sure you have the latest code.  If you do not have access, then request access here.  You must be a current SugarCRM Customer or Partner.

The key concepts for testing your Sugar 7 JavaScript code will be the same no matter the framework in use.

Testing a Dashlet

In order for this to be a realistic example, we need to identify a Sidecar component that we want to test.  You could write your test against any part of the Sugar application including the out of the box Sugar 7 Sidecar components but lets take a moderately complex dashlet that we introduced in a previous blog post called Creating a Dashlet for Sugar 7 List Views.

The Case Counts by Status dashlet that was designed to be installed on Sugar 7 Contacts, Accounts, or Cases List Views.  It queries Sugar and shows a quick summary of the number of Cases in each status.

Case Count by Status dashlet in action

Case Count by Status dashlet in action

For convenience, here is a direct link to the Case Counts by Status controller code.

We will be writing Jasmine tests for this custom dashlet.  So follow the steps in Creating a Dashlet for Sugar 7 List Views to install the custom dashlet into your Sugar custom folder in order to follow along.  If you already have a dashlet or view you want to test instead then you will need to tweak the examples below to match.

Creating our first Jasmine test

For detailed documentation on writing Jasmine tests, please refer to the Jasmine documentation. In this section, we are going to assume you are familiar with some of the Jasmine basics, such as working with specs, expectations, and file structure.

If you follow the steps to deploy the Sugar 7 unit tests (for example, here are the steps for installing unit tests in Sugar 7.6), you will have a test/ directory that is added to your Sugar 7 installation that includes many test files.  You will have Grunt and Karma installed too.

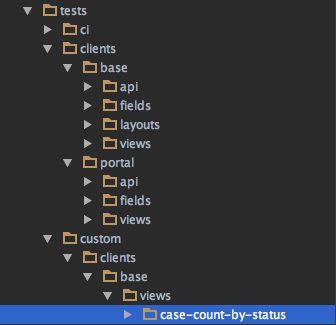
Directory structure for our additional Sugar 7 unit test

Directory structure for our additional Sugar 7 unit test

By convention, the tests/ directory mirrors the file structure of the rest of the Sugar application.

This means that when creating tests for our Case Count by Status dashlet, we will be creating them within a new file under the tests/custom/ directory.

To try our basic Sidecar test example, create the file below at tests/custom/clients/base/views/case-count-by-status/case-count-by-status.js.

You can then run these basic tests using the grunt karma:dev command from the root of your Sugar installation.  This should launch Chrome and after a few moments you will see output in your console similar to below.

mmarum$ grunt karma:dev
Running "karma:dev" (karma) task
WARN [watcher]: Pattern "/Users/mmarum/Sites/SugarEnt-Full-7.6.0.0/custom/modules/**/clients/**/*.hbs" does not match any file.
INFO [karma]: Karma v0.12.37 server started at http://localhost:9876/
INFO [launcher]: Starting browser Chrome
Chrome 45.0.2454 (Mac OS X 10.9.5) LOG: 'INFO[2015-9-7 20:8:16]: Router Started'
Chrome 45.0.2454 (Mac OS X 10.9.5): Executed 6 of 2791 (skipped 2785) SUCCESS (0.549 secs / 0.13 secs)

With Karma running in dev mode, every time you modify the test file then the unit tests will re-run interactively.  Right now, this unit test suite verifies that the dashlet parses new sets of models correctly.  However, we haven’t written any tests that verifies what happens when you remove models.

As an exercise, try adding more tests to our example test suite that ensures that the Case Count by Status dashlet properly parses removal of models as well.

Anatomy of a Sugar 7 Jasmine Test Suite

You will notice that our test has some interesting features.

SugarTest helpers in beforeEach() function

The beforeEach() function contains several lines of code that will be similar for all your Sidecar Jasmine unit tests.  This is because it is used to setup your view’s dependencies (like metadata, templates, context, and loaded JS code) in order to properly scaffold your custom View so that it can be created and tested properly.  In the main Sugar 7 application this plumbing is handled for you automatically.  But in order to properly isolate and unit test your JavaScript code, you need to set the plumping up manually using a variety of SugarTest helper functions.

In beforeEach(), many of the SugarTest helpers assume that you are only testing base Sugar 7 application files, so you will find specific utilities for working with JavaScript files and Handlebars templates located under custom/ folder within custom-component-helper.js.

Cleanup in afterEach() function

It is important to remember to cleanup after ourselves after each test.  This is important in order to ensure that our tests don’t interact with each other during execution and to prevent memory leaks that could performance of your test run.

In afterEach(), You should clear out custom metadata that you’ve used as well as dispose of any views or layouts you created during your test.

ddescribe() versus describe() functions

By default, the Karma test runner will run the all the available unit tests.  This can take a couple minutes as there are thousands of tests to run that are part of our base Sugar 7 test suite.  So adding an extra ‘d‘ in front of our describe() function at top of file is a clue to Karma to run these tests exclusively as a convenience.  This blog post explains more about how to use exclusive tests.  Just remember to change function name back to describe() when you are ready to commit your test into the full test suite.

Assertions are within it() functions

The actual tests within our file are implemented within the it() functions.  We only have a handful of expectations in this example where we actually assert that our code behaves as expected.  But clearly, you can add as many assertions as you want once you have your Sidecar view setup properly.

Jasmine Test Template

As a convenience, here is a handy template for creating your own Jasmine tests for Sugar 7 views.  Just look for the TODOs within and update those sections appropriately based on the view you are testing.  The trickiest part of writing tests is to making sure your view’s dependencies are setup appropriately in the beforeEach() function.  But once that’s complete, you’ll find creating actual Jasmine specs a snap!


Sidecar Debugger Tools now in Beta!

$
0
0

Sugar Engineering is proud to announce the Beta release of the open source Sidecar Debugger Tools project!

Sidecar Debugger Tools

This project was developed as part of the recent Partner hack week where it was a crowd favorite.  Not only is this a great developer tool for debugging and building Sugar Sidecar components, it is also useful as a learning tool for understanding the components on each page and how views, fields, and layouts work together.

It is a Chrome Developer Tools extension that adds a SugarDebug tab into your Developer Tools panel.  And it’s loaded with features that will help you build Sidecar components faster and make debugging issues easier!

It’s easy to install!  Just follow the steps on the project README.

Features

Application Stream

Capturing specific interesting events within the Application Stream

Capturing specific interesting events within the Application Stream

A timeline of what is happening in the app. It shows the methods that are called and the events that are triggered. For each of them, you have access to the passed arguments and the component object.  This is great for debugging interactions between Sidecar components.

Structure

Hover over component in structure to highlight it on the page

Hover over component in structure to highlight it on the page

A hierarchical tree representing the Sugar components of the current page.  A great way to get a visual summary of the relationships between different Sidecar Layouts, Views, and Fields.

Render times

Capturing average render times of Lead module's fields

Capturing average render times of Lead module’s fields

Allows you to measure the render duration of the different fields.  Render performance is key to a snappy Sugar user interface.

Generate records

Generating records into Account's module

Generating records into Account’s module

An easy way to generate records in your Sugar instance for testing purposes.  Super convenient when working with a fresh Sugar database.

Developer Tooltips

Dev tooltip for a dropdown in the Account module's record view

Dev tooltip for a dropdown in the Account module’s record view

You don’t need to be restricted to working with the SugarDebug tab open when you enable the developer tooltips.  Access to loads of detailed field information is always at your fingertips!

Seeking More Collaborators

This project is open sourced under the Apache 2.0 License.  We are also actively seeking contributions from the Sugar Developer community!  The great thing about these tools is they’re all written in JavaScript/HTML using Backbone.js, Handlebars, and jQuery.  Sounds familiar, right?  Any Sugar Developer should have no problems customizing these tools.

We welcome new Pull Requests that meet the project’s contributing guidelines.  We are also tracking all bugs and feature requests using the built-in Github project issue tracker.

Fork this project today!


Faster Sugar integrations using Building Blocks

$
0
0

What are Sugar Integration Building Blocks?

This is a new effort to create an open source library of re-usable common components that can be easily adapted by developers interested in integrating applications with Sugar 7.  This project is focused on the needs of SugarCRM ISVs and Technology partners that want to build integrations and get them listed on Sugar Exchange quickly and painlessly so they can be offered to Sugar customers.

This new open source project is hosted on Github at https://github.com/sugarcrm/BuildingBlocks and is accepting contributions from the Sugar Developer community.

Watch this project because more and more components and examples will be added in the coming months.

Contextual Frame Dashlet Package

One of the first building blocks is an easy to use iframe dashlet that passes contextual information about the current page to the iframe using URL parameters.  In the current package, the context that is passed is the record id (when there is one) and the module name.  The external endpoint can then use that context to create an appropriate UI to present in the iframe.

This dashlet can be easily used to create a lightweight UI integration with an external application.  It can be deployed as-is for a Proof of Concept or demonstrations or it can be easily customized for additional tailored capability.

Contextual iFrame Dashlet configuration page

Contextual iFrame Dashlet configuration page

It also happens to be a good example of a Dashlet that uses a configuration page in order to manage settings such as the base URL and the frame’s height.

Using an HTTP test service to examine the details of the frame's GET request

Using an HTTP test service to examine the details of the frame’s GET request

Out of the box, we’ve used httpbin.org  and the //httpbin.org/get endpoint to conveniently show you precisely what arguments get passed via the iframe as part of the request.  In this case, you can see from these details that the request came from a user viewing an Opportunity record.

Building the Dashlet Configuration Page

We will now deconstruct this dashlet a bit in order to better understand how the configuration page shown above works. Note that we have added a namespace prefix to the dashlet which is a good practice for custom packages and custom views installed into base platform to avoid name conflicts.

Dashlet Metadata

Our dashlet metadata now contains two different sections.  One part is the Dashlet metadata and the other is the View metadata that we will specifically use for our configuration page.

The dashlet config array above is used to define our configuration values as well as their defaults.  This will be used to populate each dashlet’s settings.  Each dashlet instance has and maintains it’s own settings object that is derived from the config defined in metadata.

The config view metadata contains a standard Sugar fields array that will make it easier for us to define the configuration user interface.

Dashlet JavaScript

The controller here is quite straight forward.  It reads the current context and settings and sets them on the current view object as a convenience for the Handlebars template that we will use to render the iframe.

Multiple Dashlet Templates

xyz_contextual-iframe.hbs is clearly what you would expect it to be but you may be surprised to see dashlet-config.hbs. When you define a config in your metadata then the Sugar Dashlet framework will rely on the dashlet-config that you provide for your user interface. In this case, our config template relies on Sugar 7 Record CSS and the Handlebars helper called the field helper (defined within sidecar/src/view/hbs-helpers.js) in order to build the Sidecar fields for our user interface seen above. All we need to do is pass it our fields array from the view’s metadata and provide it the settings as the base model that these Sidecar fields manipulate. This pattern is handy because it allows you to create a configuration interface that is consistent with core parts of the Sugar 7 UI like the Record view, core dashlets, etc.

Click here to access the code and deployable package manifest


CreateActionsView changes in Sugar 7.7.0

$
0
0

If you have been participating in the Sugar 7.7 Beta then you may have noticed that SugarCRM Engineering has refactored how CreateViews work in the Sugar application.

This post explains the motivations for the change and what Sugar Developers need to know and the actions they need to take to migrate their customizations in future Sugar 7.x releases.

Differences between Create and CreateActions

Historically, there has been some confusion in the Sugar Developer community (see here and here) around the existence of two different Create dialog layouts in the Sugar application.

CreateActionsLayout

The CreateActionsLayout includes the CreateActionsView.  This view included additional action metadata that gave the user additional options for saving a new record.  This particular layout was used for the majority of usage flows that created new records in Sugar.  Sugar Developers were taught to customize this view in order to change the behavior of the Create dialog but in reality this was never sufficient to customize the behavior of all possible Create flows.

Create with actions

Create with actions

CreateLayout

The CreateLayout includes the CreateView.  This view did not provide these additional actions.  It was used in certain flows such as when a user chooses to Quick Create a record at the top right corner of the page.  But it was not used nearly as often so a lot of Developers did not customize it or even know about it in some cases.

Create without actions

Create without actions

Relationship between Views

While CreateActionsView extends from the CreateView, they were used on separate layouts.  So while it was possible to customize the base CreateView and have those customizations appear in all possible Create dialogs in the application – a module level customization of the CreateView did not have a similar effect.  This is because the Module’s CreateActionsView ultimately extended from the base CreateView and not the module’s CreateView.  So Sugar Developers were stuck customizing a module’s CreateActionsView in order to change the behavior of most create record flows for a module.  Only sometimes would Sugar Developers separately customize the module’s CreateView when they noticed the Quick Create flow didn’t work the same way.

Relationship between CreateActionsView and CreateView in Sugar 7.6 and previous

Relationship between CreateActionsView and CreateView in Sugar 7.6 and previous

Deprecation of CreateActionsView in Sugar 7.7

It was clear that we did not need to have a separate layout and view to handle small differences in behavior that also created customization challenges.  Plus after some research, we discovered that the additional create actions (such as Save and View) were hardly ever used!  We decided to eliminate some code and confusion.  So in Sugar 7.7, we’ve started the process of merging these views together.  When you set the Sugar log level to WARN in Sugar 7.7 (using the Administration Panel), you will see warning messages that the CreateActionsView and CreateActionsLayout are deprecated in your JavaScript console whenever they are used.

Screen Shot 2015-11-16 at 5.32.25 PM

They will be completely removed in a future release (currently planned for Sugar 7.8).

CreateActionsView is deprecated in Sugar 7.7 and is planned to be completely removed in Sugar 7.8.

The benefit is that Sugar Developers will only need to customize a single view to change the behavior of all create record flows.

Migrating customizations to CreateView and CreateLayout

The action that every Sugar Developer needs to take is to migrate their CreateActionsView  (clients/base/views/create-actions/) customizations to the CreateView (clients/base/views/create/).  This will prepare you for when CreateActionsView is removed completely.

This can be as easy as the following two steps:

  1. Copy each custom|modules/.../create-actions/create-actions.js file to custom|modules/.../create/create.js
  2. Change extendsFrom: '*CreateActionsView' to extendsFrom: '*CreateView' within the new files

If you were launching the create drawer, then you should use the CreateLayout (create) instead of the CreateActionsLayout (create-actions).

For example, use this

app.drawer.open({
    layout: 'create',
    context: {
        create: true,
        ...
    }
});

not this

app.drawer.open({
    layout: 'create-actions',
    context: {
        create: true,
        ...
    }
});

Sugar Developers need to customize CreateView for their create dialog customizations in Sugar 7.7 and later


Leveraging Backbone Events in Sugar

$
0
0

Sidecar and Backbone.js

The Sidecar user interface framework is built on a variety of browser side technologies.  Being proficient in these underlying technologies is important for any developer writing Sugar 7 user interface code.

They key JavaScript component that pulls Sidecar together is Backbone.js. Backbone provides the underlying structure to Sidecar as well as providing a rich set of base features and APIs that are heavily used throughout the Sugar 7 application.

Sugar 7.6.x uses Backbone 0.9.10.

If you’ve ever created a Sugar Dashlet or any other user interface component in Sugar 7 then you will familiar with Backbone concepts such as customizing a View or working with a Model. However, many loosely coupled customizations or integrations with Sugar 7 user interface are possible through the use of Backbone Events.

For server side code, recall that you can use Logic Hooks to trap a Module’s save events instead of overriding a module’s SugarBean.  The same pattern can be applied where instead of overriding a core file, you can listen to essential events and take action as they occur.

We will explore more below.  The code from this example is also available on Sugar Integration Building Blocks project in Github.

Backbone Events

The Backbone.Events module is a lightweight pub-sub pattern that gets mixed in to each Backbone class (Model, View, Collection, Router, etc). This means you can listen to or dispatch custom named events from any Backbone object.

Backbone Events should not be confused with jQuery Events which is an API for working with DOM events. Backbone supports an events hash on Views that can be used to attach event handlers to DOM using jQuery. These are not Backbone Events. This can be confusing since both interfaces include an on() function, allow you to attach an event handler, and other similarities.

The target for jQuery events are DOM elements.  The target for Backbone Events are Backbone objects.

Sidecar classes all extend these base Backbone classes.  So each Sidecar object (Layouts, Views, Fields, Beans, Contexts, etc.) supports Events.

Existing Backbone Event Catalog

All of the existing catalog of Backbone Events are supported and triggered by the Sugar application.

For example, we can listen to built-in Backbone Router events, such as the route event, that are triggered by Sidecar.  Try running the following JavaScript code within your browser’s console.

SUGAR.App.router.on('route', function(){console.log(arguments);});

As you click through the Sugar application, each time the router is called you will see routing events appear in your browser console.

Screen Shot 2015-12-11 at 12.45.57 AM

Can you figure out what layouts were visited?

Example Sidecar Events

In addition to existing built-in Backbone Events, the Sidecar framework makes use of a variety of unique events.  We will show examples of some events that are particularly useful for customization purposes.

Not all Sidecar Events are documented below.  If you are interested, explore further by downloading the Sidecar Dev Tools and use the Application Stream to monitor many Sidecar Events as they are triggered.

Application (Global) Events

Application events are all triggered on app.events (SUGAR.App.events) object. For example, if you wanted to see all global application events printed in your browser console then you could use the following code.

SUGAR.App.events.on('all', function(){console.log(arguments)});

For example,

app:sync:complete

This is a very useful application event to know about. This event is triggered after login and the series of initial synchronization operations is completed.

This is earliest point of the application lifecycle where all metadata, view definitions, Handlebars templates, etc, are available to JavaScript code. So this is a good jumping off point for custom code.

Bean Events

Some events are triggered only on Bean objects.

For example,

validation:complete

Validation tasks are run against a Bean prior to saving a Bean object back to server.  If validation passed, then this event will pass TRUE to listeners. If validation failed, then this event will pass FALSE to listeners.

Context Events

The Context object is often used to facilitate communication between different Sidecar components on the page using Events.

For example,

button:save_button:click

This event is triggered whenever a Save button is clicked.  The Record View uses this event to run save routines without being tightly coupled to a particular save button.

Adding a new Record View button

Here is a demonstration of how you can use Events as an alternative to overriding Sidecar controllers. This approach is more upgrade and customization friendly than overriding a core application file.

The following steps will create a new custom button on the Accounts module’s Record View and wire it to a JavaScript callback function.

Screen Shot 2015-12-11 at 2.26.25 AM

Wiring in our new Button

Step 1: Insert Button Metadata

We need to add Button metadata to the existing Accounts view using a Sidecar Extension.  This defines the Sidecar Event to be triggered as well as the target object for the event.

custom/Extension/modules/Accounts/Ext/clients/base/views/record/custom_button.php

Step 2: Add Event handler JS using JSGroupings

We can add event handling JavaScript into page using a JSGroupings Extension. This is designed to attach a callback function to the appropriate Context object when the application is on the Account module’s Record view.

custom/Extension/application/Ext/JSGroupings/addCustomButtonJS.php


Step 3: Quick Repair and Rebuild

You then need to run Quick Repair and Rebuild in order to build your new extensions.  You will also need to do a hard refresh of the browser page in order to load the updated JavaScript files.

customButtonResult

Button action all wired together without overriding any Sidecar controllers


Sidecar Event Management

As with any single page application, it is important to include memory management considerations when you are coding your solutions. Event handlers can be a common source of memory leaks in JavaScript applications since they can prevent the objects they are attached to from being garbage collected. You do not want to keep old Sidecar Views, Layouts, etc, in memory long after they should have been removed.

Here are a couple tips.

For global objects, make sure your event listener is attached only once. Make sure you understand the lifecycle of the objects you are working with.  Do not guess.

Events get detached from Sidecar created objects. The Context object and any Layouts, Views, Fields that are created by Sidecar are disposed of whenever a new layout is loaded via Sidecar’s built-in controller.  This process detaches any listeners attached on these objects.  This is why it was not necessary for us to remove the Context listener in the example above.

If you created it, then you need to clean it up.  If you have JavaScript code that calls app.view.create* then you are responsible for disposing of it properly.  Calling dispose() on your own components when you are finished with them will remove event listeners as well as detach it from the DOM, etc.  Otherwise the view, your event listeners, and anything else that is attached could stay in memory forever.

Use Backbone’s listenTo() and stopListening() functions where possible.  They are designed to make automatic management of Events easier.


Adding a new popup view in Sugar 7.x Record View

$
0
0

Here is a guest post from Shijin Krishna from BHEA, an Elite SugarCRM Partner, and active member of the Sugar Developer community.

Are you interested in posting on the Sugar Developer Blog? Contact developers@sugarcrm.com with your idea.

In this post we are going to see how we can add a quick create pop-up view for related modules in record view. This idea is taken from Sugar Portal which comes with Sugar Enterprise, Ultimate and Corporate editions. Sugar Portal’s detail view for Bugs and Cases modules includes an action to add a note to the bug or case. In this post, we are going to see how we can create a similar quick create pop up on the base Sugar 7 web client which will be shown at the click of a button.

We will use Cases and Notes modules as our basis.  We shall place a new ‘Add a Note’ button in Cases record view.  This button will be wired to display a pop-up create view for adding notes on the current case record.

The terms modal and popup are sometimes used interchangeably in Sugar 7 codebase and documentation. A modal dialog requires that a user interacts with it before they can continue. In many frameworks such as Bootstrap, modals are implemented as a child frame that “pops up” on the application screen.  In Sugar 7, Drawers are more commonly used than popups.

Adding a new Record View button

The following steps will create a new custom button on the Cases module’s Record View and wire it to a JavaScript callback function. These steps has been taken from Matt’s blog post on Leveraging Backbone Events in Sugar.

Step 1: Insert Button Metadata

We need to add Button metadata to the existing Cases record view using a Sidecar Extension. This defines the Sidecar Event to be triggered as well as the target object for the event.

custom/Extension/modules/Cases/Ext/clients/base/views/record/add_note_button.php

Step 2: Defining the Sidecar Event to be triggered on click of the button

To define the event to be triggered on click of our custom button, we will override the record view controller for Cases.

custom/modules/Cases/clients/base/views/record/record.js

add_note_button

Adding a new Quick Create View for Notes Module

Our next step is to create a new custom quick create popup view for Notes module. We will extend our custom view from the Baseeditmodal view.

File Structure

We’re going to create a folder in custom/modules/Notes/clients/base/views/ called “quick-create“. Inside that folder we will create 3 files:

  • quick-create.php
  • quick-create.js
  • quick-create.hbs

Your file system should look something like the following screenshot.

file_structure

Step 1: Implement the Quick Create View Metadata (.php file)

The following metadata can be modified according to your needs. If you wish to see more fields in the quick create popup then you can add those fields as well to the fields array.

custom/modules/Notes/clients/base/views/quick-create/quick-create.php

Step 2: Implement the Quick Create View Controller (.js file)

Here is the JavaScript controller for our quick create view. We will extend our view from BaseeditmodalView.

custom/modules/Notes/clients/base/views/quick-create/quick-create.js

Step 3: Implement the Quick Create View Template (.hbs file)

Below is the Handlebars template for our custom quick create view. We need to add some CSS style for the popup to make it look better. We have added a new CSS class ‘quick-create’ for the modal element so that we can selectively apply new styling to our quick create popup without affecting the style of other modal popups being used elsewhere in Sugar.

The template has a form which contains the fields and buttons defined in view metadata. We have used a book icon in the modal header from FontAwesome. If you are trying this example in any sugar version prior to 7.6.x then you may need to make sure you are using a different FontAwesome class name for this icon. Refer to this blog post for more details.

You can find the available list of icons in Sugar Styleguide accessible from the Administration panel of your Sugar instance.

custom/modules/Notes/clients/base/views/quick-create/quick-create.hbs

Step 4: Add custom CSS style for our Popup (.less file)

Feel free to change the style as you wish!

custom/themes/custom.less

Step 5: Define the display labels for our new UI

Our final step is to define the display label for the custom record view button and for the quick create pop up header.

custom/Extension/modules/Cases/Ext/Language/add_note.en_us.lang.php

Step 6: Quick Repair and Rebuild

Finally, you will need to run Quick Repair and Rebuild in order to build your new extensions. You will also need to do a hard refresh of the browser page in order to load the updated JavaScript and CSS files.

After this, you will be ready to use your new quick create popup dialog. Visit the Cases module and click the Add a Note button and you should see a dialog like this one below.

notes_quick_createview


Using Script and CSS loading plug-ins for easy Sugar integrations

$
0
0

Getting 3rd party JavaScript into Sugar

The most common UI integration point between Sugar and external applications is the trusty Sugar Dashlet. This is why we spend so much time talking about Dashlets here on the blog and at our Sugar Developer events throughout the year. However, if you are building something more complicated than an iframe dashlet integration then there is often a requirement to pull 3rd party JavaScript into the page. For example, many integrations are facilitated using JavaScript API client libraries.  Or there is code that a developer is trying to reuse that relies on JavaScript libraries that Sidecar does not already use.

Out of the box, this developer has a couple different options:

Use JSGroupings Extension

Using JSGroupings extension allows you to include additional JavaScript files with the core Sugar application JS that is pulled into the page when the Sugar application is loaded. The drawback is that this JavaScript will get pulled into the page whether or not it is ever used by a user.

Adding script tags to page dynamically

You could add script tags to your Handlebars template or via a Sidecar controller. But this approach adds a bunch of ugly complexity to your code as you have to manage many routine tasks related to loading scripts.

Providing another way!

But Sugar gives us the tools we need to design another way! Below we will explore using the Sidecar plug-in framework to provide an easy way to dynamically load JavaScript and CSS for use with your custom Sidecar components.

Sidecar Plug-in Framework

In Sugar 7, we introduced a plug-in framework that allows you to Mixin additional functionality into your Sidecar component with minimal fuss. If you have created a Sugar Dashlet before then you have already used the Dashlet Sugar 7 plug-in.

Under the Sidecar covers, the plug-in manager uses Underscore extend() to add properties from the plug-in to your component. In the case of the Dashlet plug-in, this adds the necessary APIs that Sugar needs to display and manage your view within Sugar Dashboards.

There are two important facts to keep in mind when working with Sidecar plug-ins.

Sidecar plug-ins are not extensible

You cannot extend a Sidecar Plug-in like you can a standard Sidecar component such as a view, layout, field, etc. So when creating Sidecar plug-ins, we recommend making them as lightweight and granular as possible so you can easily mix, match, and replace plug-in combinations in Sidecar components.

Sidecar plug-ins should be installed using JSGroupings extension

Also, we recommend registering your new custom Sidecar plug-ins using the JSGroupings extension. Below we will provide a couple of examples that shows more details on how this works.

Registering your Sidecar plug-in

Adding a plug-in to Sugar is as easy as calling app.plugins.register(). Lets break down the parameters.

app.plugins.register(name, validTypes, plugin)

Parameter Description
name (String) Plugin name that you want to use
validTypes (String|Array) list of component types this plugin can be applied to.  Limited to view, field, layout, model, and collection as of Sugar 7.6.
plugin (Object) Plug-in object

Plug-ins are registered after the Sugar application has been initialized. When registering a plug-in using JSGroupings extension, you should do so within an app:init event handler. You will see this in both examples below.

To read the full Sidecar plug-in manager documentation, view the doc blocks in sidecar/src/core/plugin-manager.js.

CssLoader Plug-in

Our CssLoader example is quite simple. The Css Loader plug-in is also available over at the Sugar Integration Building Blocks project in Github. It tracks the Stylesheets loaded in the browser and only adds a new link tag to pull in new CSS files as needed.


ScriptLoader Plug-in

The Script Loader plug-in is also available over at the Sugar Integration Building Blocks open source project in Github. This plug-in relies on RequireJS to do most of the dirty work related to loading and managing JavaScript libraries.


Highcharts and Unicorn Buttons Dashlet Example

Now we can create a simple Dashlet that leverages both of our new plug-ins to easily pull in a couple different external libraries dynamically. In the example below, we use Highcharts and Unicorn UI Buttons but you can adapt this example to use whatever JavaScript or CSS libraries that you need.


Easy right? This is what it looks like when it is installed on a Sugar Dashboard.

Screen Shot 2016-01-28 at 11.38.37 AM

Highchart and Unicorn Buttons within a Dashlet


Addressing Subpanel Creep in Sugar 7.7

$
0
0

Subpanel Creep

The Subpanels section is where you find related records for the current displayed Sugar record. This is a vital feature because it allows a user to get a unified view of all the CRM records related to a particular record.  Who are the Contacts associated with the Account? When is the last time I talked to this Customer?  These answers are typically found within the subpanel section.

Screen Shot 2016-02-26 at 3.50.46 PM

A very common customization in Sugar is to create new Custom Modules or to add new types of relationships between existing modules in the CRM.  For example, at SugarCRM we use Sugar to track Sugar Subscriptions within a custom module.  These Sugar Subscriptions are related back to the Account record for each and every customer we have. So there is a Subscriptions subpanel that appears on every Account record for this relationship.

Module relationships and even custom subpanels are slowly added over time to every Sugar instance – but rarely does anybody go back and remove them. This can cause problems since every subpanel has a cost associated with it.

Each subpanel is populated via an API request that queries additional database tables. Also each subpanel adds weight to the client user interface with additional HTML and JavaScript objects associated with them. If you have 15, 20, or more subpanels on your modules then opening a single record can generate a lot of overhead as these panels are rendered and are populated.

Performance is a priority at SugarCRM Engineering. So it was necessary for us to tackle this common issue head on.

If you are in the Sugar Beta program, then you can try out the Sugar 7.7 Beta to observe the following changes.

Sugar Developers who have heavily customized Sidecar Subpanels need to carefully test their customizations when upgrading to Sugar 7.7.

Refactored to improve Subpanel performance

We have (re)introduced record counts on subpanels.

Screen Shot 2016-02-26 at 4.59.37 PM

Subpanels with counts in Sugar 7.7

This is a great UX touch! It also helps avoid situations where users open subpanels just to see if there are new related records.

We have also optimized the rendering of Subpanels so that subpanel lists are rendered only when subpanel is expanded. Previously, they would be rendered as hidden HTML which would impact client side performance unnecessarily.

A full related record query that selects all fields in list view is only used when the subpanel has been expanded.

These changes necessitated a refactor of functions related to toggling and rendering of subpanels. Sugar Developers who have heavily customized Sidecar Subpanels need to carefully test their customizations with Sugar 7.7.

System Setting to collapse Subpanels by default

In the past, Sugar would always fetch subpanel data immediately upon navigating to a record view. Subpanels that were opened by users would be “sticky” and remain open when users visited other records within the same module.

For example, if you left the Contacts subpanel open on the Accounts module, then every time you returned to an Account the Contacts subpanel would be open and related record data would be fetched to populate that subpanel.

This behavior can now be controlled using a System Setting.

Screen Shot 2016-02-26 at 4.40.28 PM

New collapse_subpanels in Sugar 7.7

With the collapse_subpanels configuration setting enabled, all Sidecar subpanels will be collapsed by default for all users when they visit Record views.

Enabling the $sugar_config[‘collapse_subpanels’] setting is highly recommended for Enterprise customers or situations where “subpanel creep” has taken hold in your Sugar deployment.


Adding a viewed status to Notes Module

$
0
0

Here is another guest post from Shijin Krishna from BHEA, an Elite SugarCRM Partner!

Notes is a common module used to track ad hoc information within Sugar. Sugar Enterprise customers that use the Customer Self-Service Portal will notice that comments logged in that system appear as Notes within Sugar.  So making sure there are not any unread Notes can be important daily task for these users. But how do you know if you have viewed each Note already?

In this post we are going to explore how we can add Read and Unread statuses to the Notes module.

This idea is taken from the Sugar Notifications Module which also comes out of the box with Sugar. Basically we will have a new field type styled with Bootstrap labels. The Notes status field will be highlighted with a green label if it has been read and a red label if it is unread.

This new field will be available for Record, List and Subpanel List views. The status will automatically change to Read when any Sugar user opens and views a Note. Notes created through Customer Self-Service Portal will be marked Unread while those created in Sugar by regular Sugar users will be marked as Read.  However, Sugar users will also be provided the option to toggle this status by clicking the viewed status label.

We will also provide mass update functionality to update the status of many selected notes all at once!  Whew!

Step 1: Adding a new field for Notes Module

Our first step is to create a new status field for Notes module.

Navigate to Admin > Studio > Notes > Fields

Create a new drop down field with name ‘is_read_c’. Select the list name as ‘notifications_status_dom’. I have set the display label as ‘Status’. But you can change the label as per your wish. Also keep the Mass Update check box checked.

Step 2: Create new Read field type

Our next step is to add a new field type called Read for the Notes module. Our new field is_read_c will use this new field type.

Read Field Controller

custom/modules/Notes/clients/base/fields/read/read.js

Read Field Templates

Below we define detail and list view templates for the new field type.

custom/modules/Notes/clients/base/fields/read/detail.hbs

custom/modules/Notes/clients/base/fields/read/list.hbs

Step 3: Add Status field to Notes View metadata

Now we will add the status field to Notes module views through extensions. Below steps will explain you how to add the fields to record and list view. You can add the extension file to add the field to subpanels as well.

custom/Extension/modules/Notes/Ext/clients/base/views/record/record.php

recordview

Notes Read status on Record View


custom/Extension/modules/Ext/Notes/clients/base/views/list/list.php

notes_listview

Notes Read status on List view

Step 4: Add display labels for the new field type

Our final step is to define the display label for our new field using Language extension.

custom/Extension/modules/Notes/Ext/Language/sugarfield_is_read.lang.en_us.php

Step 5: Run Quick Repair and Rebuild

Finally, you will need to run Quick Repair and Rebuild in order to build your new extensions. You will also need to do a hard refresh of the browser page in order to load the updated JavaScript and CSS files.


Handling of JavaScript files in Sugar 7.7

$
0
0

This post is a follow up on a question we posed on the Sugar Developer Community.

The “Rebuild Minified JS Files” action is used to rebuild the contents of the jssource directory.

pastedimage_0

We are considering removing this particular action from the UI because, generally, rebuilding the minfied JS files is not something we would expect most users to need to do.  While customizing jssource files is not upgrade safe, we recognize some folks in Sugar Developer community may be using this action for one reason or another.

Where is JavaScript stored in Sugar?

As of Sugar 7.7, the application stores JavaScript in multiple locations on the filesystem.

Core JavaScript files are stored in many places: under the include directory, the vendor directory, under many modules subdirectories, etc.  We also separately store Sidecar framework JavaScript files under the sidecar directory.

Copies of unminified core JavaScript source files have traditionally been placed under the jssource directory.

At runtime, core JavaScript files are minified and concatenated into groupings stored under the cache directory.  The contents of the JavaScript cache are regenerated as needed at runtime.

The Sugar application generally only uses the JavaScript stored in the cache directory at runtime. For example, a browser page running Sugar does not refer to any files under the jssource path.

In reality, there is no compelling need to store JavaScript files in three different locations. We need only one copy of unminified sources and one copy of minified sources located under the cache directory.

Keeping copies of unminified source files in a separate location under jssource is superfluous and increases confusion about how JavaScript files are handled.

Changes for Sugar 7.7 release

The following actions have been removed from the Sugar Administration user interface in Sugar 7.7.  They are available under the Repair panel.

  • Rebuild JS Compressed Files
  • Rebuild Minified JS Files
  • Repair JS Files

These three actions all rebuild core JavaScript files based upon contents of jssource directory.  This is not necessary when the JavaScript in the cache directory gets rebuilt during a Quick Repair or at runtime as needed.

While they have been removed from the UI, these actions still exist and have just been deprecated. You can still manually run these JavaScript actions if needed.

Manually running these actions

As an example, you can navigate to the following URL to run the Repair JS Files action from your browser.

http(s)://path_to_sugar/index.php?module=Administration&action=RepairJSFile&type=replace&run_deprecated_feature=1

You may need to update your config_override.php file to include additional http_referer configuration if you encounter a Cross Site Request Forgery (XSRF) warning.  Directions are included on that warning page if you encounter it.

For example, here is a config that will allow localhost to run the Repair JS Files action.

config_override.php

<?php
$sugar_config['http_referer']['list'][] = 'localhost';
$sugar_config['http_referer']['actions'] =array( 'index', 'ListView', 'DetailView', 'EditView', 'oauth', 'authorize', 'Authenticate', 'Login', 'SupportPortal', 'LogView', 'SugarpdfSettings', 'saveftsmodules', 'SaveSequence', 'PasswordManager', 'LicenseSettings', 'Updater', 'Backups', 'Languages', 'Locale', 'Upgrade', 'repair', 'GlobalSearchSettings', 'Diagnostic', 'EnableWirelessModules', 'ConfigureTabs', 'UpgradeWizard', 'ConfigureShortcutBar', 'wizard', 'historyContactsEmails', 'GoogleOauth2Redirect', 'RepairJSFile' ); 

If the action was run successfully, you should see the expected message.

Screen Shot 2016-03-30 at 5.17.23 PM

Repair JS Files message


Changes in upcoming Sugar releases

The jssource directory will be remove completely.  Unminified sources will still be available outside of the cache directory.  We also will then remove the code related to the deprecated JavaScript repair actions because at that time they would have use.


Viewing all 27 articles
Browse latest View live